

This watercolor shell painting is a colorful and fun summer art project idea! Kids will draw simple seashell shapes, learn easy watercolor techniques, and add black marker details. This is a great painting idea for older kids and tweens.
There are so many fun watercolor techniques for kids to try! Take a look at my collection of watercolor painting for kids for more fun and creative ideas.

These adorable seashell paintings can be done quickly and easily, kids will want to make more than one! Using course salt with watercolors helps to create texture for the background that resembles sand or water.
For a more detailed look at watercolor techniques take a look at these 5 easy watercolor techniques for kids.
For another watercolor art project that uses salt to create texture, take a look at these easy watercolor flowers for kids to make.
Create your own shell watercolor painting
This post contains affiliate links. As an Amazon Associate, I earn from qualifying purchases. If you would like more information please review my privacy & disclosure policy.

Supplies
- Watercolor paper
- Watercolor paint (you can use a paint set or liquid watercolors and a paint palette)
- Paintbrushes
- Black fine-line marker
- Coarse salt
- Pencil and eraser
- Water dish
Instructions for your seashell painting
1. First, get your watercolor paper ready. I cut my paper to an 8-inch square to keep the paintings small and focus on just one simple shell.
Kids can choose to use the same type of shells in my examples or look at some photos of shells for inspiration.

Draw out a simple shell shape with a pencil. Remind kids to press lightly so they can erase if needed. Think about adding in a few detail lines where you would like the paint to go.
Your pencil sketch will also act as a guide when you outline your painting, so think about where you would like to put in some detailed lines with a black marker after you have finished your painting.

2. Think about the colors you want to use on your shell and test out your colors first on scrap watercolor paper. I used blue and purple shades for one shell, pink and light tan shades for another, and different shades of green for the scallop shell painting.
Start by painting your shell with clean water, being careful to not get any water outside of your shell drawing.

3. While the paint is still wet, start to add in the colors. Use a smaller round brush for this step and paint one color at a time. Follow your pencil guidelines being careful to not paint outside the shell.
Painting on the wet paper will help keep the colors soft and slowly start to spread and mix on the paper. The colors will blend together as the paper dries.

As you can see from my example photos, there is still white paper showing through on the shells. So have kids think about leaving some white areas as they paint.
Once you are done painting in the shell, let it dry completely before moving on to the next step.
4. Decide on a background color and test out your paint on a scrap piece of paper. I used sand colors and blue in my examples. You only need 1-2 shades of color for the background.

Have your coarse salt ready.
Carefully, paint around your shell with clean water. Go slowly and do not paint inside the shell.
5. While your paper is still wet, paint your background, being careful not to get any paint inside the shell. Leave a lot of white areas around the edges of your paper like in the example photos.

6. Sprinkle the salt on your background while the paint is still wet. As the paint dries the salt will create patterns and texture.
Let your paper dry completely on a flat surface.

Once your paper is completely dry, carefully brush off the salt into a sink or garbage, revealing the design the salt made!
7. Time to add the finishing details to your painting. Use a fine-point black marker to carefully outline your shell. Using the pencil lines from your initial sketch as a guide, draw in some final detail lines.

This mini watercolor shell painting is just adorable! This is a great summer art project idea for older kids and tweens. There are so many different shells and colors kids can choose, each painting will be unique!

If you are looking for more summer art projects, take a look at this amazing collection of summer art ideas for kids!
More summer art projects kids will love
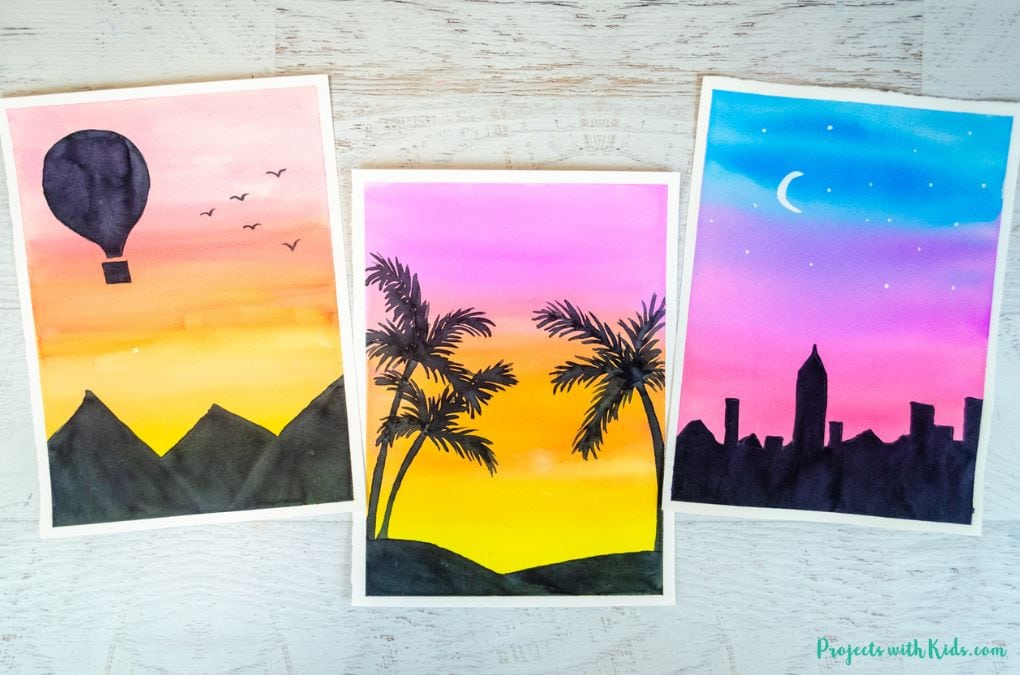
Sunset Silhouette Watercolor Painting Idea
Follow me on Pinterest for more creative project ideas!
Pin this painting idea for later

EASY WATERCOLOR SHELL PAINTING FOR KIDS

Make an adorable mini watercolor shell painting for a fun summer art project! Learn easy watercolor techniques.
Materials
- Watercolor paper
- Watercolor paint (you can use a paint set or liquid watercolors and a paint palette)
- Paintbrushes
- Black fine-line marker
- Coarse salt
- Pencil and eraser
- Water dish
Instructions
- Prepare the paper and draw your shell: Cut watercolor paper to an 8-inch square. Draw a simple shell shape lightly with a pencil. Add a few detail lines for the paint.
- Choose colors: Decide on the colors for your shell and test them on scrap paper. Possible color ideas include blue and purple, pink and tan, or various greens.
- Wet the paper: Paint the shell area with clean water, avoiding the edges.
- Add colors: Use a small brush to paint your colors on the wet paper, following your pencil lines. Let the colors blend and leave some white areas. Allow the shell to dry completely.
- Background prep: Choose a background color and test it on scrap paper. Have coarse salt ready. Carefully paint around the shell with clean water.
- Paint background: Paint the background while the paper is wet, leaving some white areas around the edges. Sprinkle salt on the wet paint for texture. Let it dry completely.
- Brush off the salt: Once dry, brush off the salt in the sink or garbage to reveal the texture it created.
- Outline details: Use a fine-point black marker to outline your shell and add final detail lines, following your initial pencil sketch.


